Got feedback? Additional questions? Just want to have a friendly chat?
Get in touch!
|
This article only addresses the basic filtering options
This article only addresses the basic filtering options that are available in the UI. You can also create more advanced filters through a query language, which is explained here. |
Introduction
This article lists the available temporal filters and how you can apply them.
It is strongly recommended to first read the introduction article which explains how the visual analytics page uses these filters.
The available temporal filters
The main temporal filter is a range filter, which is specified using a start and end time. Only records with a time stamp inside that range will be shown.
In addition, you can further fine-tune temporal filtering by specifying:
-
Which days of the week to include or exclude, for example only showing records that took place during a weekend;
-
Which hours of the day to include or exclude, for example to only include records that happened in the morning;
-
Which months of the year to include or exclude.
Creating the temporal filter
Using the timeline for the range filter
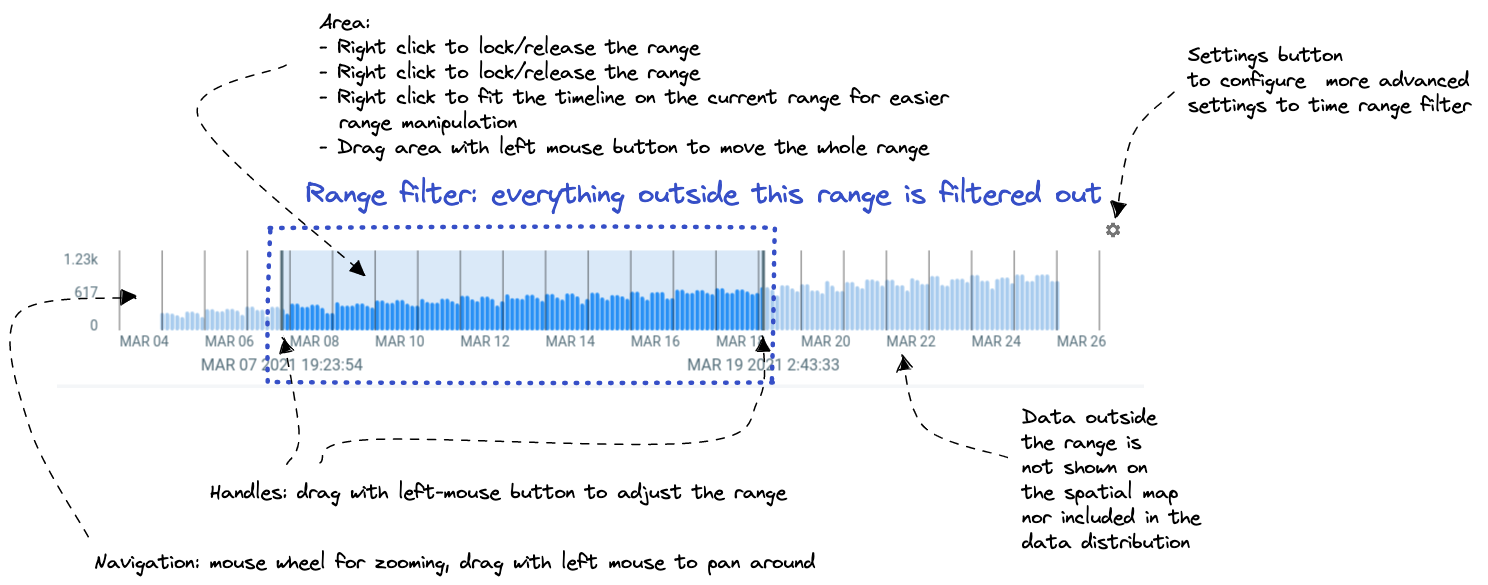
You specify the range for the temporal filter using the timeline below the map.
-
You can drag the timeline left and right or zoom in and out (using the scroll wheel) to change its timescale and time interval.
-
You can change the range by dragging either the handles, or the whole area.
Figure 1. Different ways of adjusting the range filter on the timeline
-
You can apply more advanced settings to the time range by clicking on the settings button in the top right corner of the timeline. After pressing the button, the following dialog will be shown. This dialog is discussed in more detail in the next section.
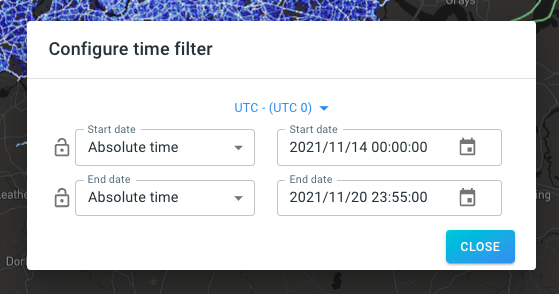
Figure 2. Dialog to adjust the range filter on the timeline
Selecting a smart subset of the range
Next to filtering on a time range, you can also filter on specific hours of the day, days of the week, and so on. You do so in the Filters section of the Layers panel on the right-hand side of the visual analytics page.
-
In the first drop-down, select Time
-
In the second drop-down, select what you want to specify (days of week, hours of day, or months of year)
-
Use the range slider to select the filter values
-
Press the INCLUDE button
-
The filter will be added to the list at the bottom of the panel. You can remove the filter afterwards by clicking on the cross icon.
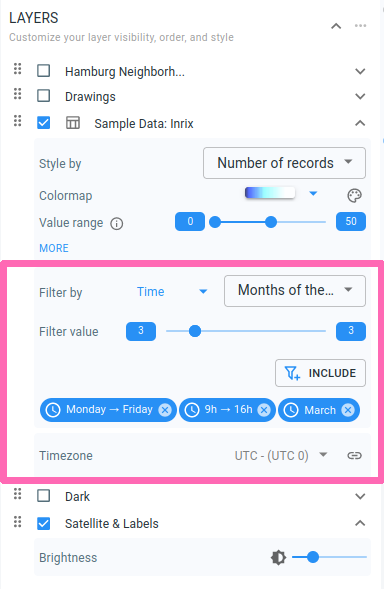 Figure 3. The filters panel with included time filters
|
These time filters are interpreted in the timezone specified at the bottom of the panel. By default, this timezone is the same timezone as configured on the timeline, but you can change this using the dropdown. |
Smart locking of the temporal filter
You can configure your range filter in different ways by using Configure time filter dialog, e.g., select a precise date, set a lock on a date, set a fixed filter window, set a relative delta between the start and end filter, etc.
For a single timeline
-
Select a precise date for the start/end date by using an Absolute time option and, optionally, configure a lock on it. The lock will ensure the chosen start or end time will remain in place, even if the user manipulates the timeline with the mouse.
-
Create a fixed filter window by using an After start of this filter or Before end of this filter option. When dragging the filter on the timeline, this fixed window will remain in place.
-
Set the start/end filter relative to the start/end of the data by using After start of data sets or Before end of data sets option. This can be useful for example when you want to build widgets on dashboards that always report on for example the last week of data. If you upload new data, this filter will update automatically based on the updated time range of the data set.
For two timelines
-
Synchronize the two timeline filters by linking the timelines via the link button or by selecting the Same as start date of Timeline and Same as end date of Timeline options. This way you can for example analyze the same time period for two different regions on the map.
-
Synchronize only the start or end times of the filters by using Same as start date of Timeline or Same as end date of Timeline option. This way you can for example configure the first timeline to filter on a time period adjacent to the second timeline’s filter.
-
Set the filter from one timeline relative to the other by using After end of filter Timeline 1 or Before start of filter Timeline 2.
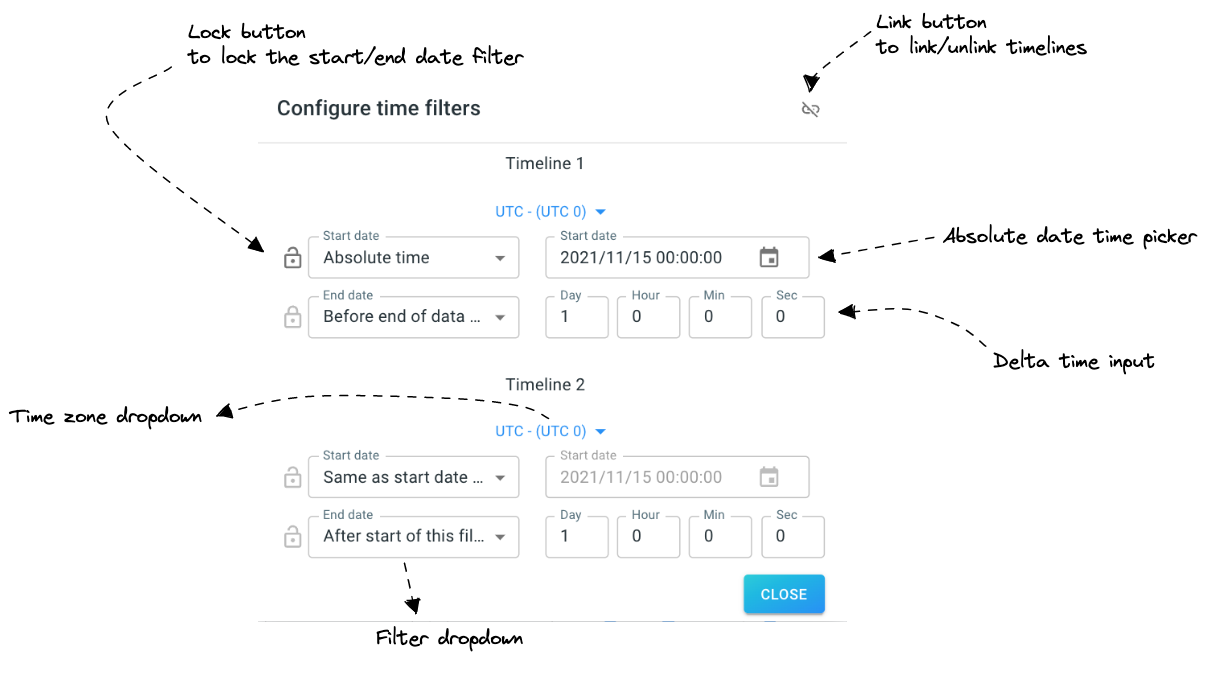
Figure 4. Dialog to adjust the range filter on two timelines
Example usages
Example 1: Selecting exact dates
When you want to specify the exact start and end date of your filter, you select Absolute time for the start and end date. You can also lock your filters start and end time, so that if you manipulate the timeline by for example zooming in/out, the time range does not change.
Example 2: Showing data for the last 3 days
Imagine you want to look at the last 3 days of your data, and if you add new data, you want the filter to update to the new days. You can accomplish this by selecting in the start date filter - Before end of this filter and apply 3 days delta, and in the end date filter select - Before end of data sets and apply a 0 days delta. At this point you will always be looking at the last 3 days of your data.
Note that this also applies to any widget that you create after you set the time filter. This way you can build a dashboard to monitor always the last 3 days.
Example 3: Showing data for a specific date with one week difference
Imagine you want to analyze a specific day of the week, and compare it with the same day of another week. You can do this by defining a delta between two timelines. This can be done by first creating a second map and timeline, and by then configuring the timeline filters as follows:
-
Timeline 1
-
Start date - select - Before end of this filter and apply a delta of 1 day
-
End date - select - Before start of filter Timeline 2 and apply a delta of 6 days
-
-
Timeline 2
-
Start date - select - Absolute time and choose the day you want to look at
-
End date - select - After start of this filter and apply a delta of 1 day
-
Now, you analyze one day of data on the left, and the same day, one week later, on the right. In addition, you can drag the timeline left and right, and your constraint will remain in place.
Got feedback? Additional questions? Just want to have a friendly chat?
Get in touch!