Got feedback? Additional questions? Just want to have a friendly chat?
Get in touch!
Available parts
- Goal
- About INRIX trip paths data
- Uploading INRIX trips data (current)
- Getting started using INRIX trips data
Uploading INRIX Trip Paths data
Now that you understand the structure and content of an INRIX Trip Paths reports folder, we can upload the data to the xyzt.ai platform. The steps to follow are:
-
Create a new geometry data set for the road segments network, by providing a
nameanddescription.-
Define the road segments data properties to be used. This for example includes the segment id, road name and road class. We will provide a template for this.
-
Upload the road segments SHP files.
-
-
Initialize a new movement path data set, by providing a
nameanddescription.-
Configure the geometry data set defining the road segments to be used by the new movement path data set.
-
Define the trajectories data properties to be used. This for example includes the
TripId,SegmentIdandCrossingSpeedKph. We will provide a template for this. -
Upload the trajectories
.csv.gzfiles using drag’n’drop. -
Define the trips metadata properties to be used. This for example includes the
TripIdandVehicleWeightClass. Also for this, there is a template. -
Upload the trips
.csv.gzfiles using drag’n’drop.
-
| In this tutorial you will perform all actions through the web interface. In case your account supports REST API access, all these actions can be automated and scripted. Please refer to the REST API tutorial and the API reference. |
Step 1: Initialize a new geometry data set for the roads
Initialize a new geometry data set by:
-
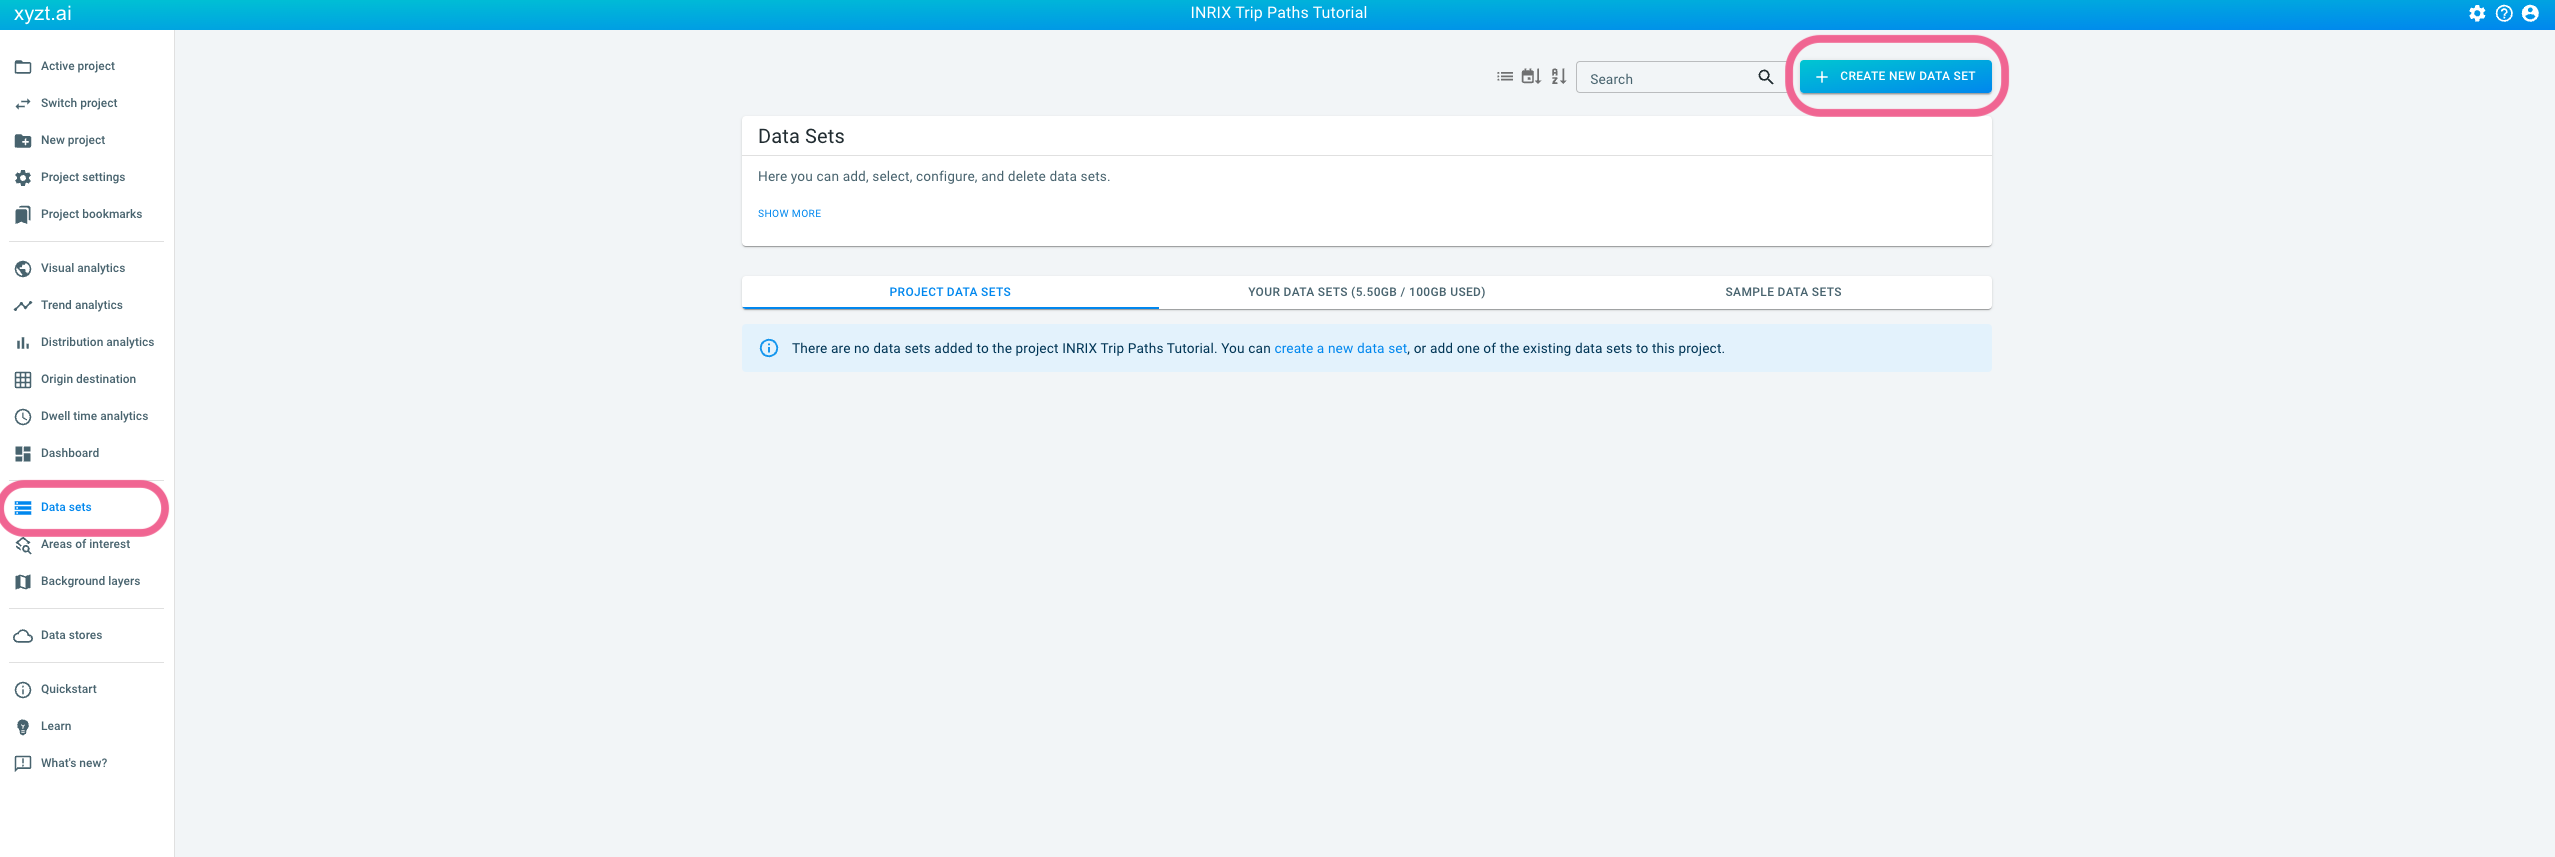
Navigating to the data sets page.
-
Clicking on the CREATE NEW DATA SET button in the top-right area of the data sets page.
-
Providing the following properties:
-
Name:
My First INRIX Roads Data Set, -
Data type:
Geometry data, -
Geometry file type:
SHP, -
Describes what your shapes represent:
roads,-
This information is used in the graphical user interface, including the charts to provide the correct name of the assets/entities that you are analyzing. In the INRIX case, these are roads.
-
-
Description:
Road segments network from INRIX.
-
-
Finally, click on the CREATE DATA SET button.
Figure 1. Navigate to the data sets page using the navigation bar on the left.
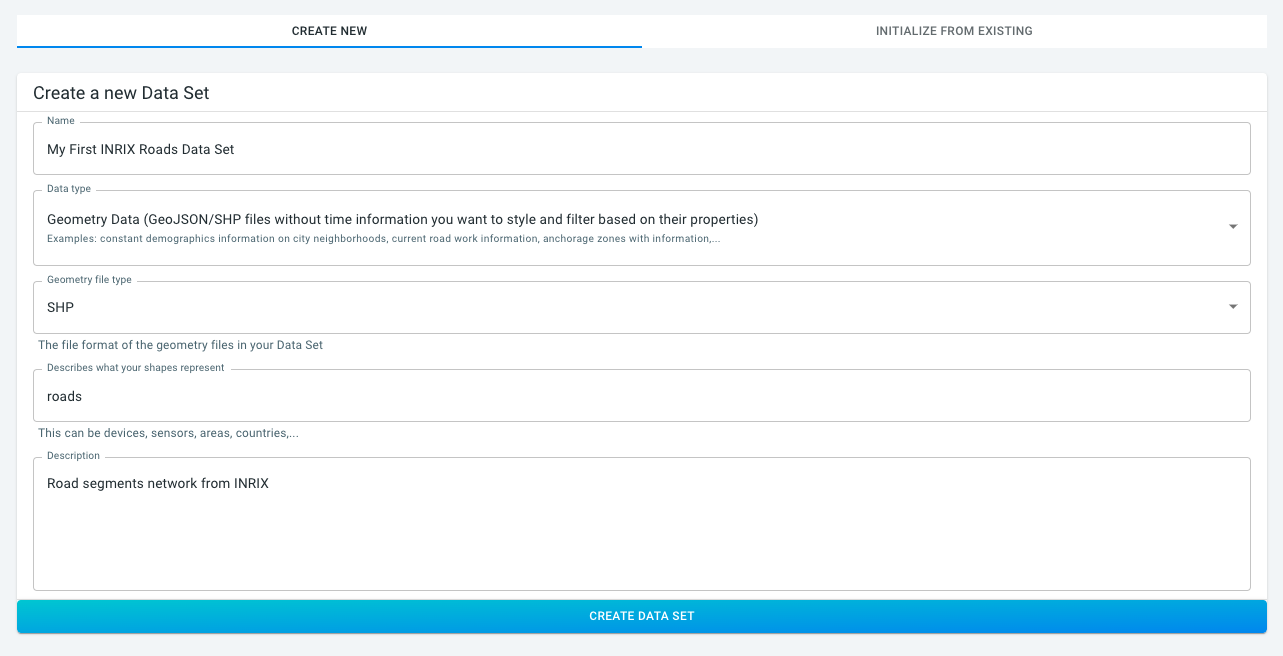
Figure 2. Defining the data set name, description, and more.
Step 2: Define the road data properties
Now that you have initialized a new roads data set with its name and description, the next step is to define the structure of the SHP files.
For the INRIX data, we are going to take a short-cut and upload a configuration file that defines the structure. Such configuration file can be created manually in a text editor, or through the wizard in the platform.
Define the structure of the geometry files as follows:
-
Download properties_roads_en.csv.
-
Click on the configure UPLOAD PROPERTIES FILE tab next to the WIZARD tab.
-
Drop the
properties_roads_en.csvfile on the drop box.
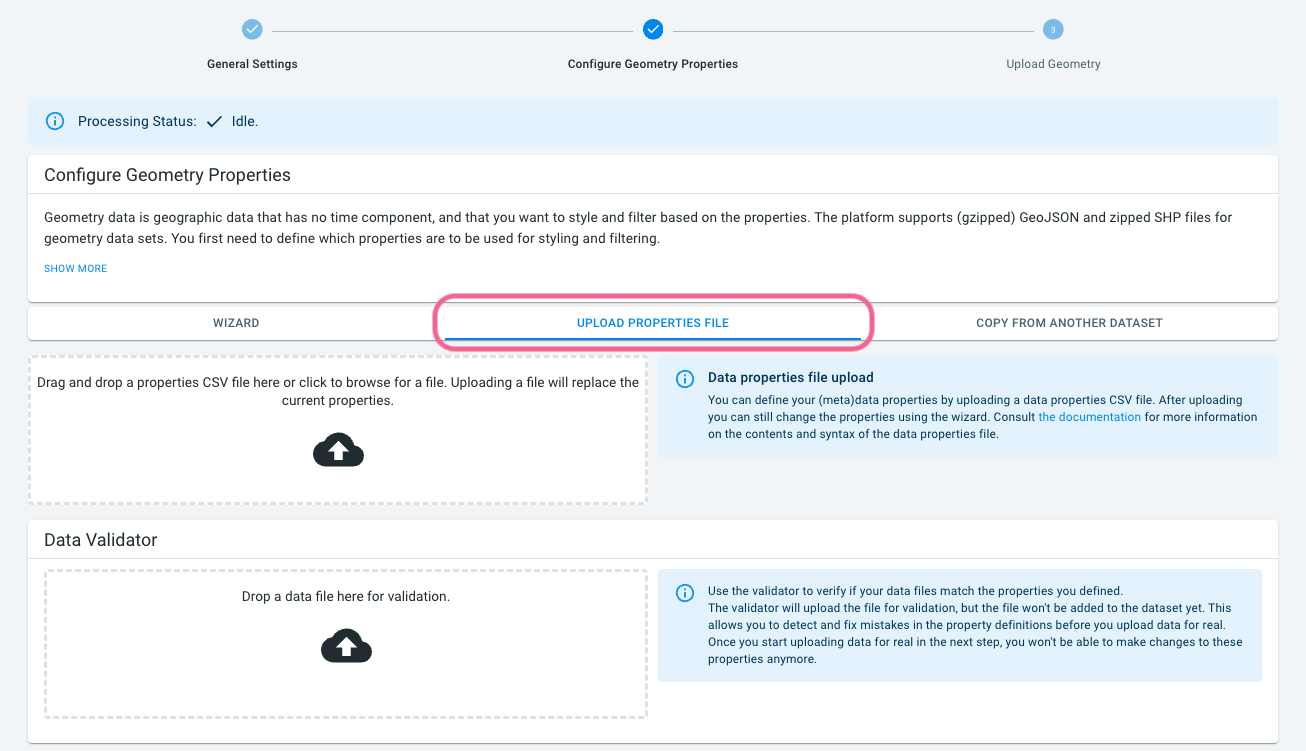
Figure 3. Second step during data creation is defining the properties of the roads SHP files.
You should now see a table at the bottom of the page summarizing the defined properties. I
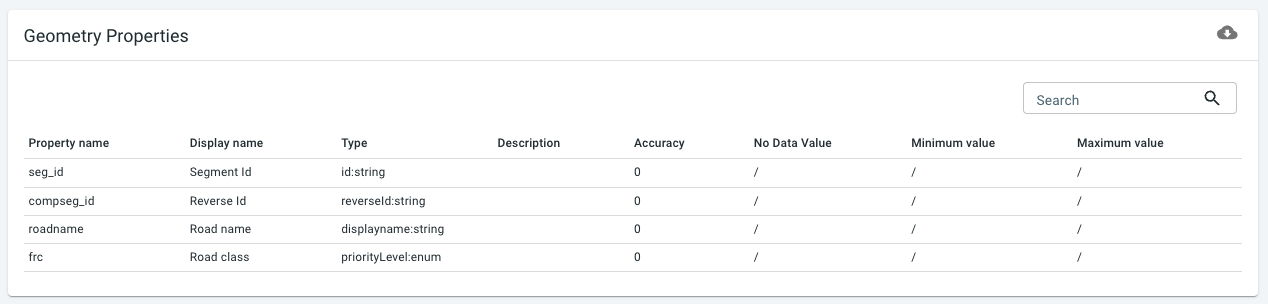
Figure 4. Table summarizing the geometry (road) properties.
Now click on the WIZARD tab. Here you will only see the enabled properties.
You can expand each property, as shown below for the Road name property. At this stage, before having uploaded any SHP data, you can still further edit and configure the data set definition.
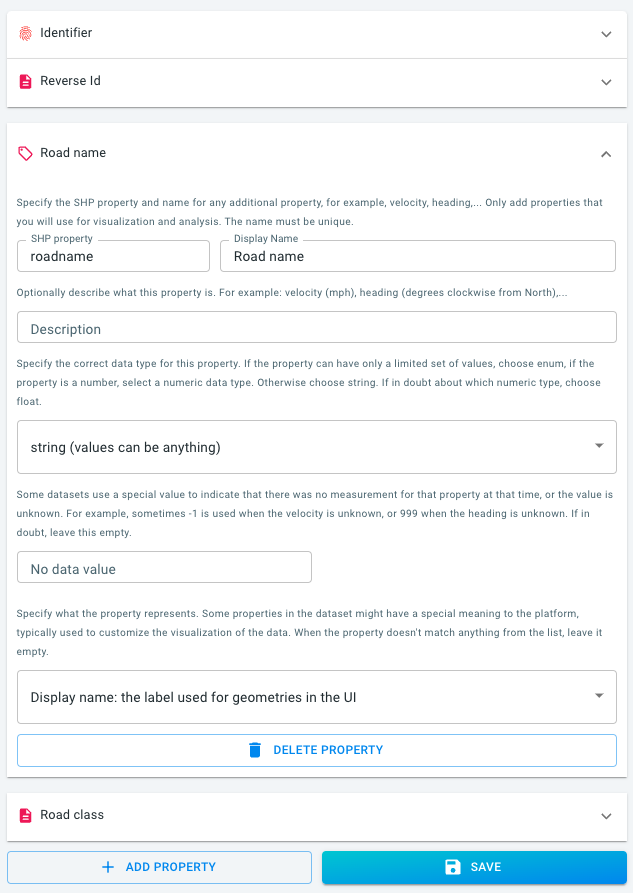
Figure 5. Wizard view of the defined geometry properties.
Note the presence of the following properties:
-
the
seg_idproperty provides for each road segment its segment id, which will be referred to from the entries in the trajectories files. -
The
roadnameproperty provides for each road segment the road name, if available -
The
frcproperty indicates the road class, which is an indicator of the importance of each road. It ranges from 1 (most important, e.g. highways) to 6 (least important, e.g. local service roads). It is used to generate a scalable, multi-leveled map, reducing the amount of roads to be visualized/analyzed when zooming out, improving both readability and performance. ThepriorityLevel:enumproperty type is used to tell the platform to use this property for generating multiple map levels. -
The
compseg_idproperty provides for each road segment the id of the reverse road segment, in case of a two-way road. This information allows the platform to properly render two-way roads and analyze two-way traffic.
Step 3: Upload the road segment SHP .zip files
You can now upload the road segment files using drag’n’drop by going to the 3rd step of the data creation process. Select the SHP .zip files in your file browser/explorer and drop them on the drop box.
| Make sure to keep the browser and the tab open while files are being uploaded. |

Figure 6. Step 3 of the data creation wizard is uploading the road segments zip files using drag’n’drop.
The uploaded files will be processed and stored in a highly optimized spatial database. For this a processing job will be scheduled and queued. Depending on the availability of cloud resources, this processing will start immediately or within a couple of minutes.
You can follow the progress of the processing job at the top of the page. Processing might take from a couple of minutes to a couple of hours depending on the size of the data.
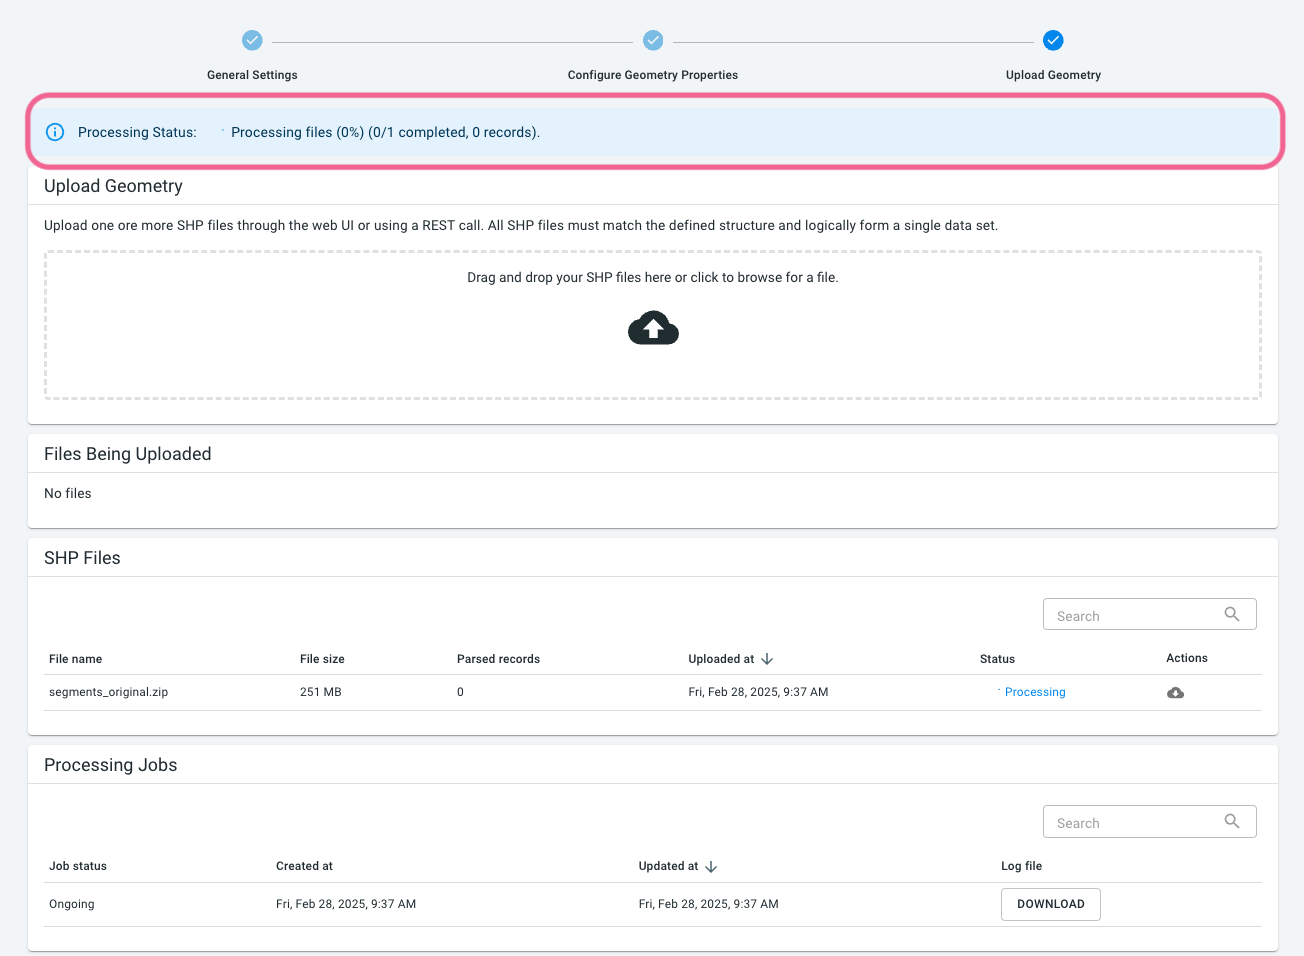
Figure 7. Processing progress is shown at the top of the page.
Optional: When the processing is done, you can visualize the road network data by:
-
Creating a new project
-
Attaching the data set to the project
-
Opening the visual analytics page
If you then choose Style by Road class and zoom in on the data, you should see something like the below:
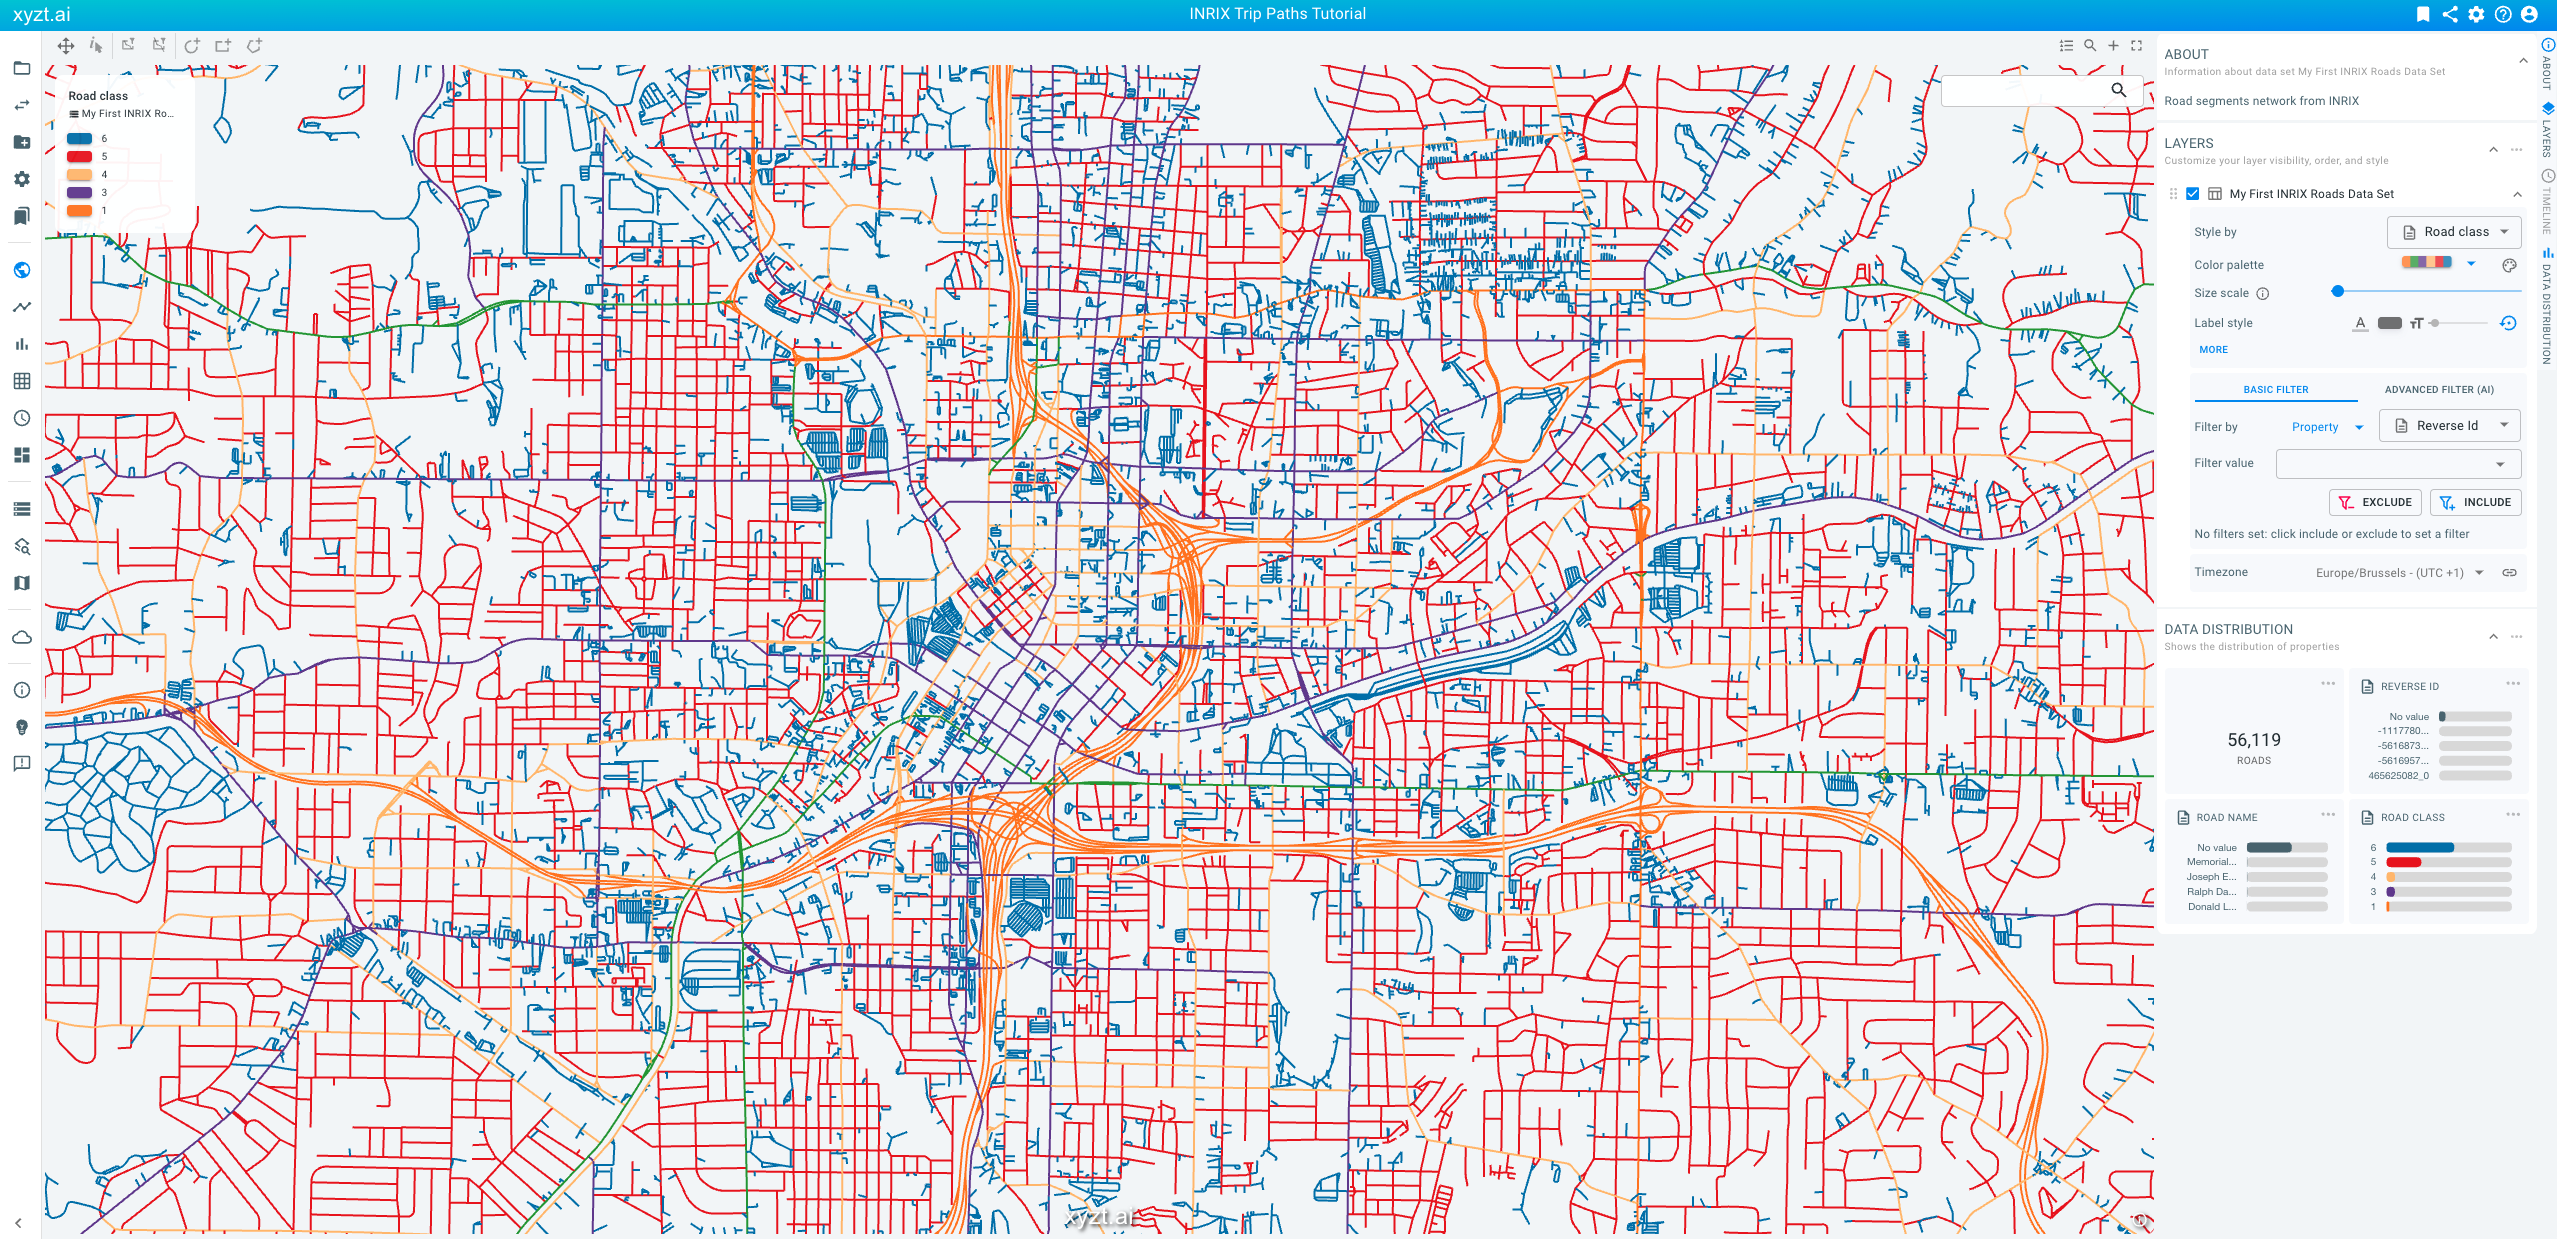
Figure 8. Roads visualized styled by road class property.
Step 4: Initialize a new movement path data set for the trips
Initialize a new movement path data set by:
-
Navigating to the data sets page.
-
Clicking on the CREATE NEW DATA SET button in the top-right area of the data sets page.
-
Providing the following properties:
-
Name:
My First INRIX Trip Paths Data Set. -
Data type:
Movement Path Data. -
Data file type:
CSV(the default value). -
Metadata file type:
CSV(the default value). -
Describing what is moving:
trips.-
This information is used in the graphical user interface, including the charts to provide the correct name of the assets/entities that you are analyzing. In the INRIX case, these are trips.
-
-
Description:
Floating vehicle data set consisting of trajectories and trips from INRIX.
-
-
Finally, click on the CREATE DATA SET button.
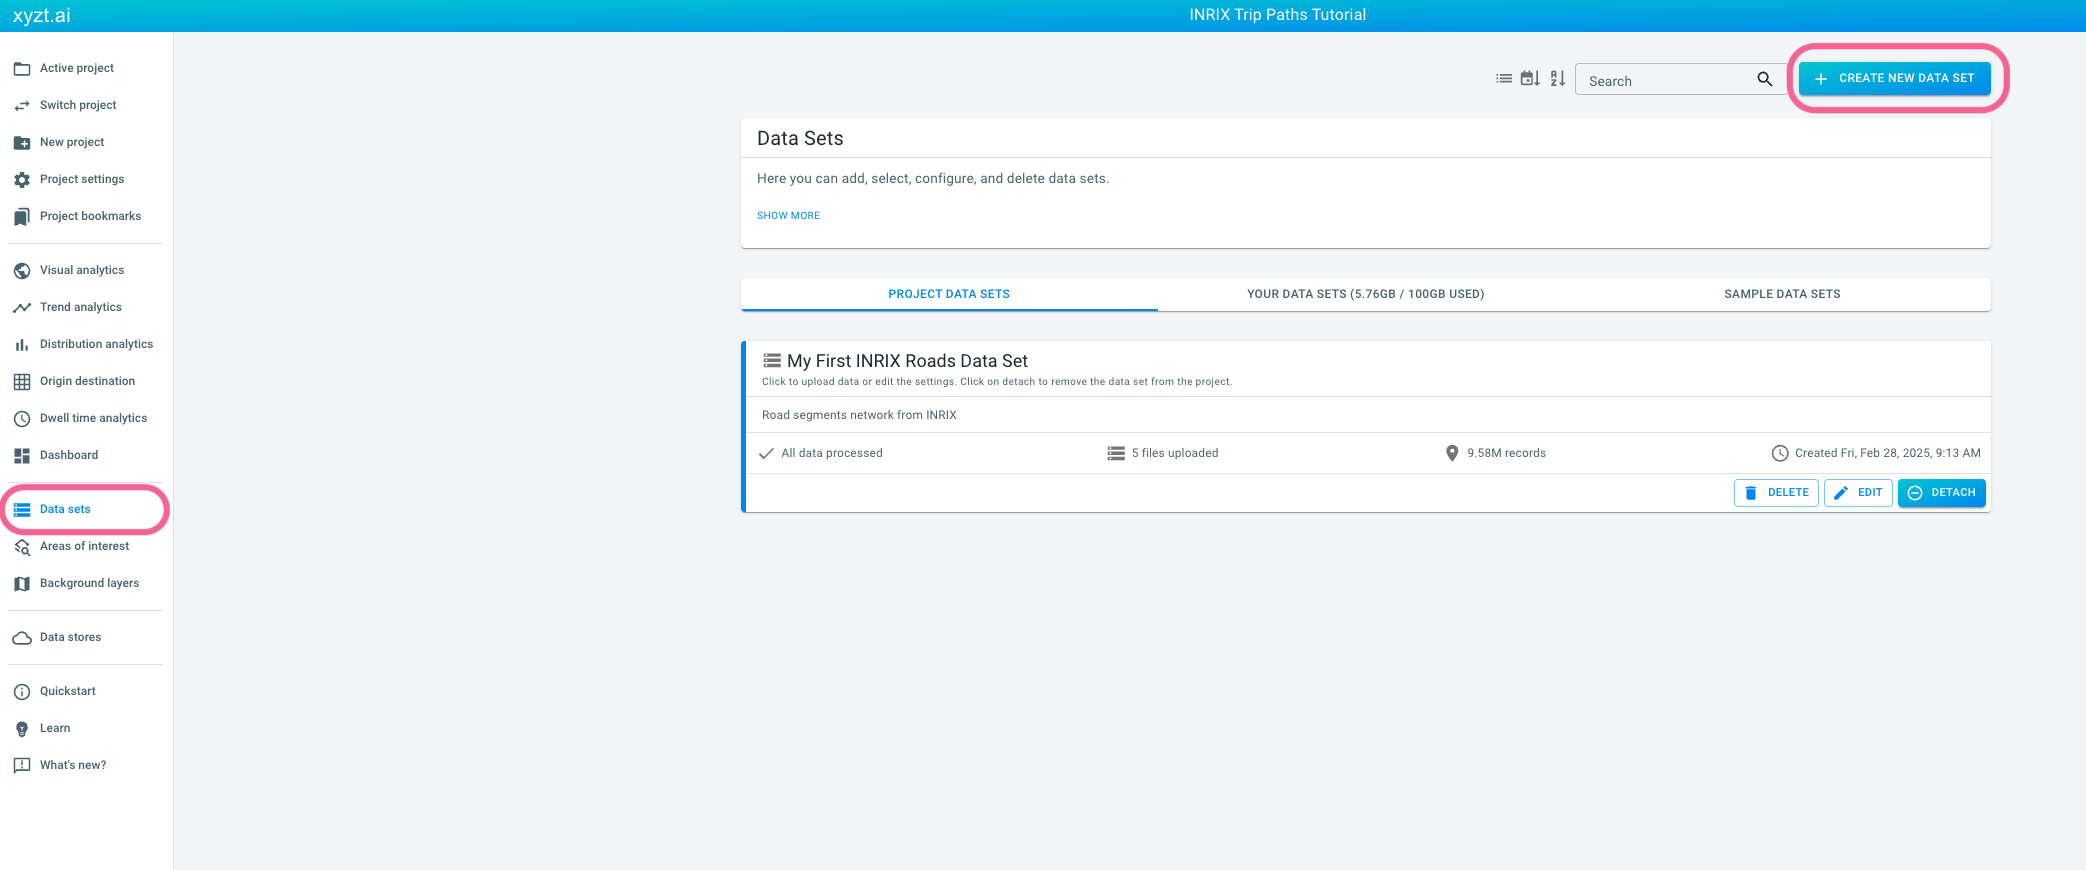
Figure 9. Navigate to the data sets page using the navigation bar on the left.
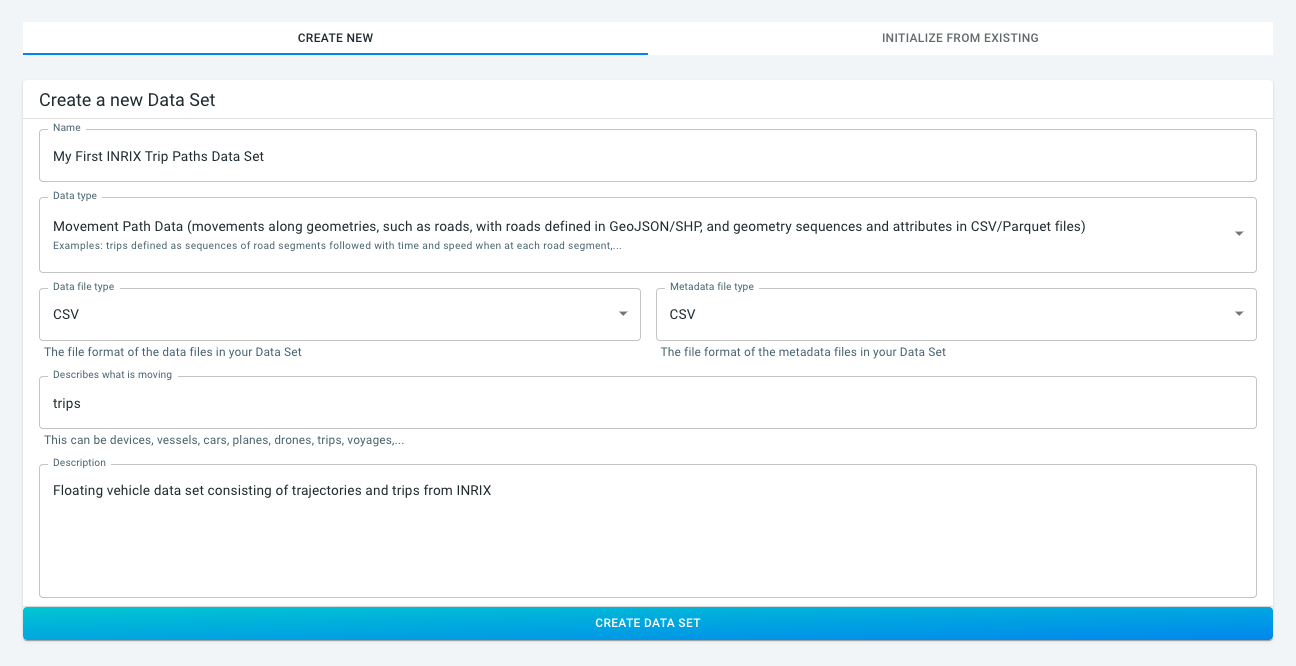
Figure 10. Defining the data set name, description, and more.
Step 5: Select the geometry data set to use
In this step, you select the geometry data set that we created before. Click on the drop-down and select the top-most data set.
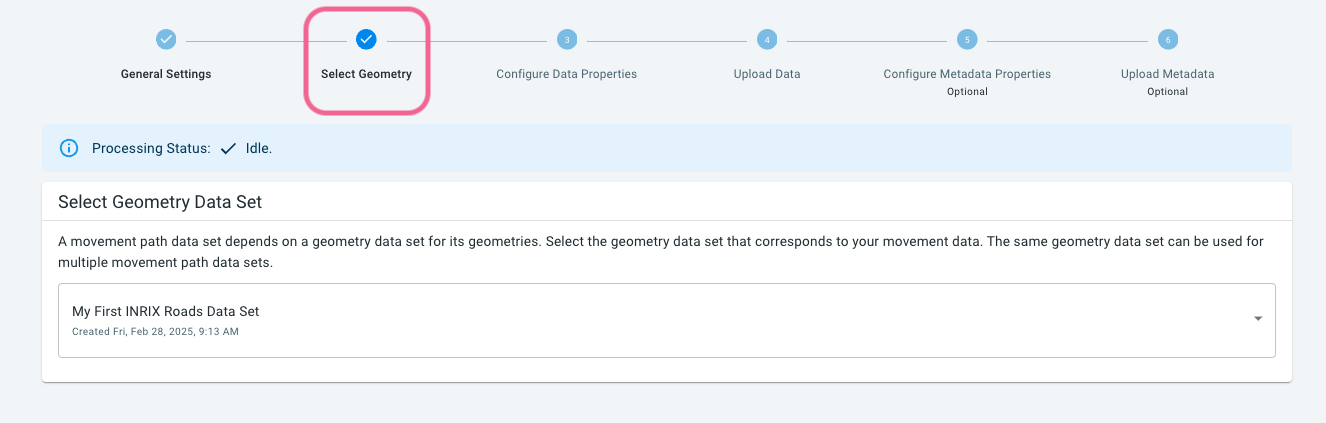
Figure 11. Selecting the geometry data set to use.
The INRIX trip paths data references the geometries in this data set. Note that you can use the same geometry data set in multiple movement path data sets. Once a geometry data set is used by a movement path data set, it cannot be deleted.
Step 6: Define the trajectories data properties
Now that you have initialized a new data set with its name and description, the next step is to define the structure of the trajectories files.
For the INRIX data, we are going to take a short-cut and upload a configuration file that defines the structure. Such configuration file can be created manually in a text editor, or through the wizard in the platform.
Define the structure of the trajectories files as follows:
-
Download dataproperties_trajs_en.csv.
-
Click on the UPLOAD PROPERTIES FILE tab next to the WIZARD tab.
-
Drop the
dataproperties_trajs_en.csvfile on the drop box.
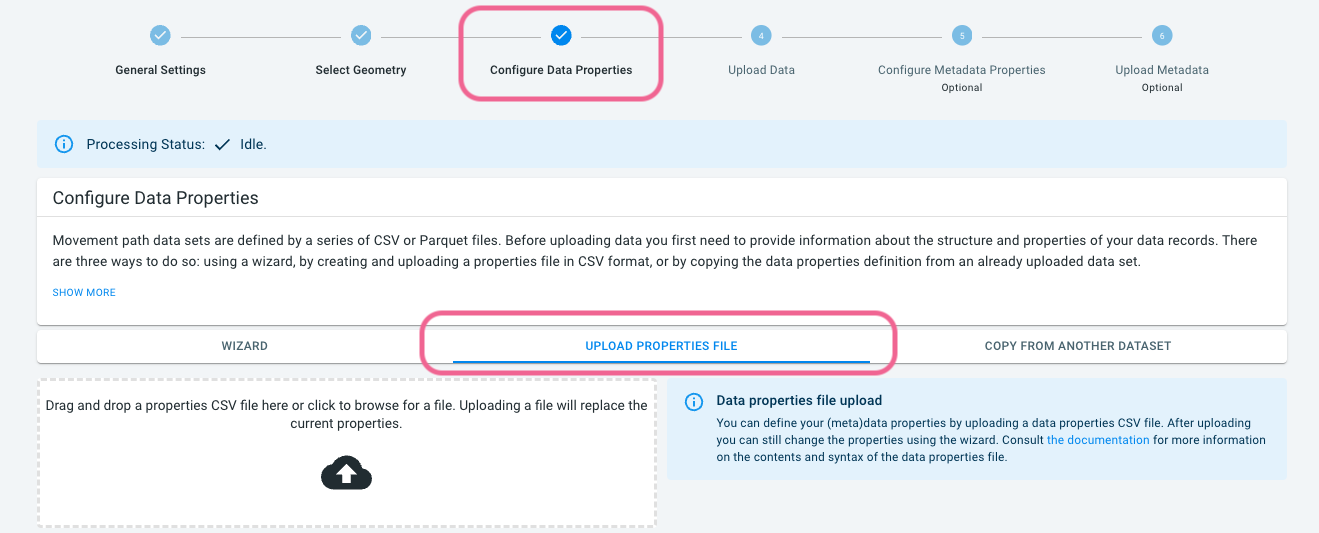
Figure 12. Third step during movement path data creation is defining the properties of the time-varying data (trajectories).
You should now see a table at the bottom of the page summarizing the defined properties. In the table you will also see which properties are enabled and disabled.
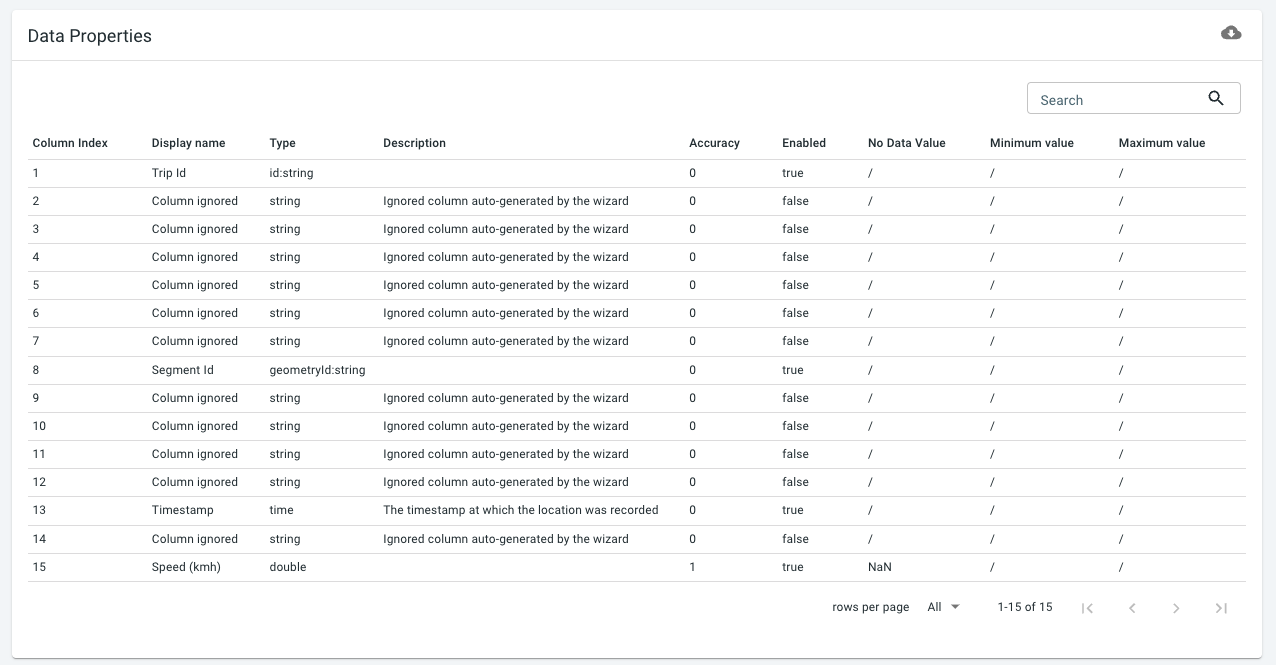
Figure 13. Table summarizing the data (trajectories) properties.
Now click on the WIZARD tab. Here you will only see the enabled properties. These are the properties that will be available in the platform after uploading the INRIX data.
You can expand each property, as shown below for the Speed (kmh) property. At this stage, before having uploaded any trajectories data, you can still further edit and configure the data set definition.
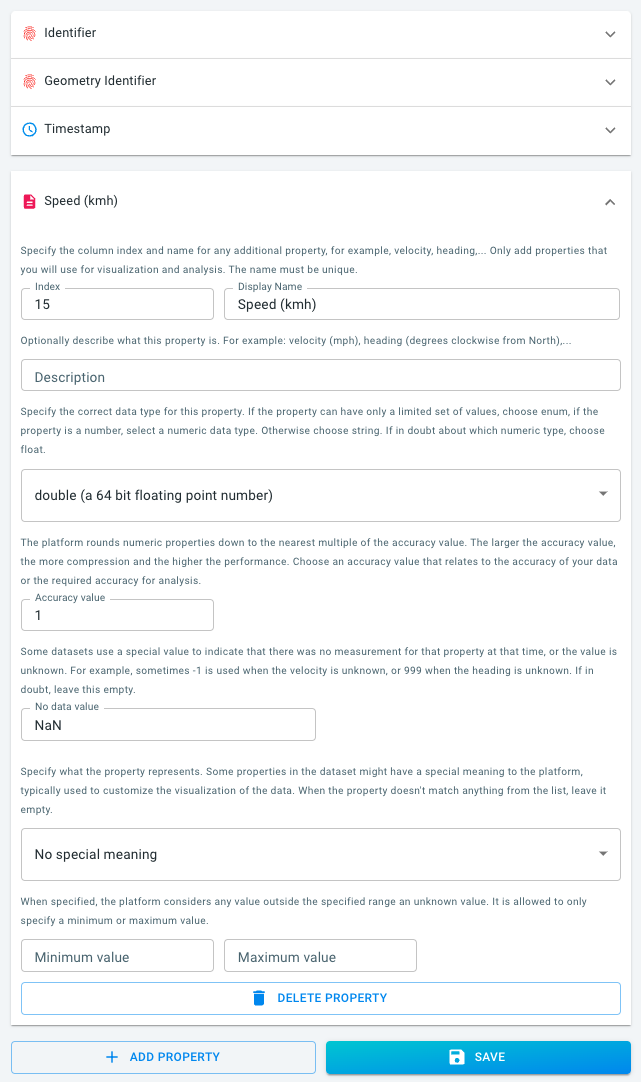
Figure 14. Wizard view of the defined data (trajectories) properties.
Note how for the Speed (kmh) property, we used:
-
An accuracy value of
1. This means that you will be able to analyze speeds up to 1 km/h accuracy. -
A no data value of
NaN. INRIX usesNaNwhen there is no known speed value.
Expand the other properties and note that:
-
There is an Identifier property that identifies each trip
-
There is a Geometry Identifier property that references the roads
-
There is a Timestamp property that uses the time the trip enters a road segment
-
There is the Speed (kmh) property that we discussed above
Step 7: Upload the trajectories .csv.gz files
You can now upload the trajectories (trajs.csv*.gz) files using drag’n’drop by going to the 4th step of the data creation process. Select the files in your file browser/explorer and drop them on the drop box.
| Make sure to keep the browser and the tab open while files are being uploaded. |
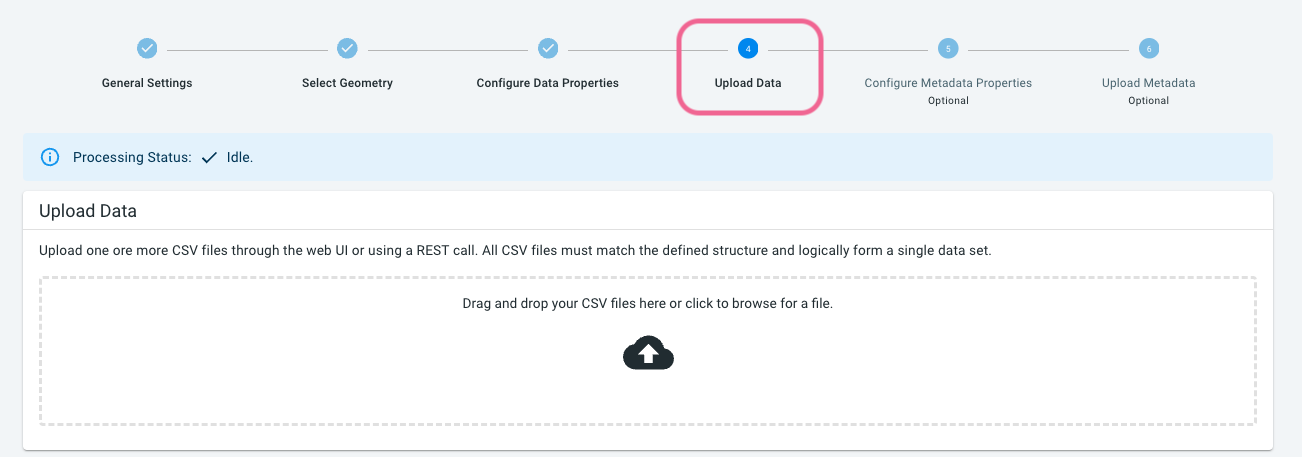
Figure 15. Step 4 of the data creation wizard is uploading the trajectories .csv.gz files using drag’n’drop.
Also for this step, the data is processed in a highly optimized data structure. Depending on the amount of data, this processing can take between minutes and hours.
Step 8: Define the trips metadata properties
You have now uploaded the individual trajectories (road sequences followed) for the trips. The next step is to upload the (constant) information about the trips themselves.
For the xyzt.ai platform, the trips information is the metadata. Similar to the data, you have to provide the information on the trips .csv.gz files and the columns in the file to the platform.
This can be done in step 5 through a wizard, or you can upload a pre-configured configuration file as follows:
-
Click on Configure Metadata Properties at the top of the page to go to step 5 of the data creation process.
-
Click on the UPLOAD PROPERTIES FILE tab
-
Download metadataproperties_trips_en.csv.
-
From your file browser/explorer drag’n’drop the downloaded file on the upload box
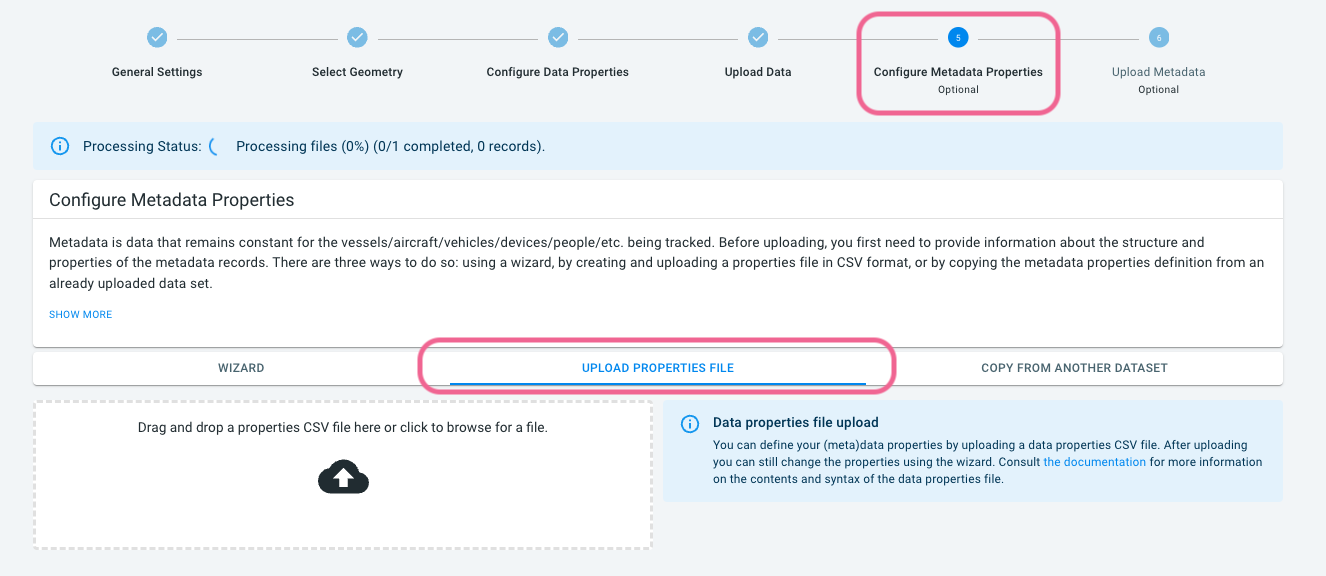
Figure 16. Step 5 is defining the metadata (trips) properties.
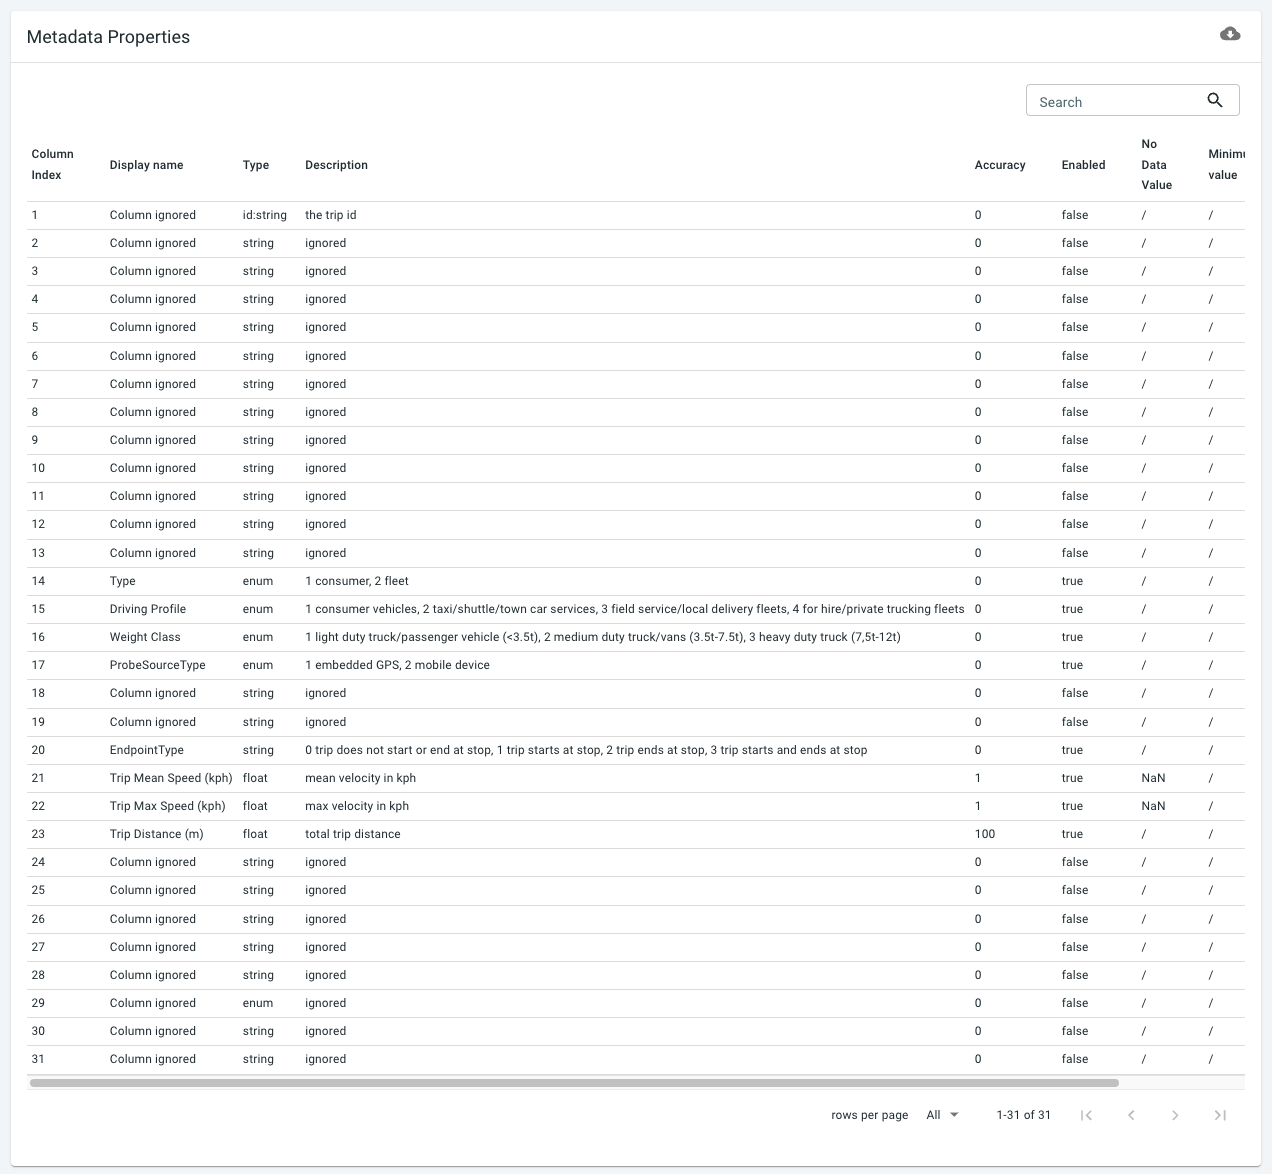
Figure 17. Table summary of the defined metatadata (trips) properties.
The uploaded configuration file is summarized in the table shown at the bottom of the page. As you can see, many properties are disabled, but for example, Weight Class is enabled.
Also here, you can go to the wizard, and modify any of the configuration.
Step 9: Upload the trips .csv.gz files
Now that you have defined the structure of the trips .csv.gz files, you can upload the trips files themselves.
-
Navigate with your file browser/explorer to the
tripsfolder. -
Select all
trips.csv.gzfiles and drop them on the drop box under step 6 Upload Metadata
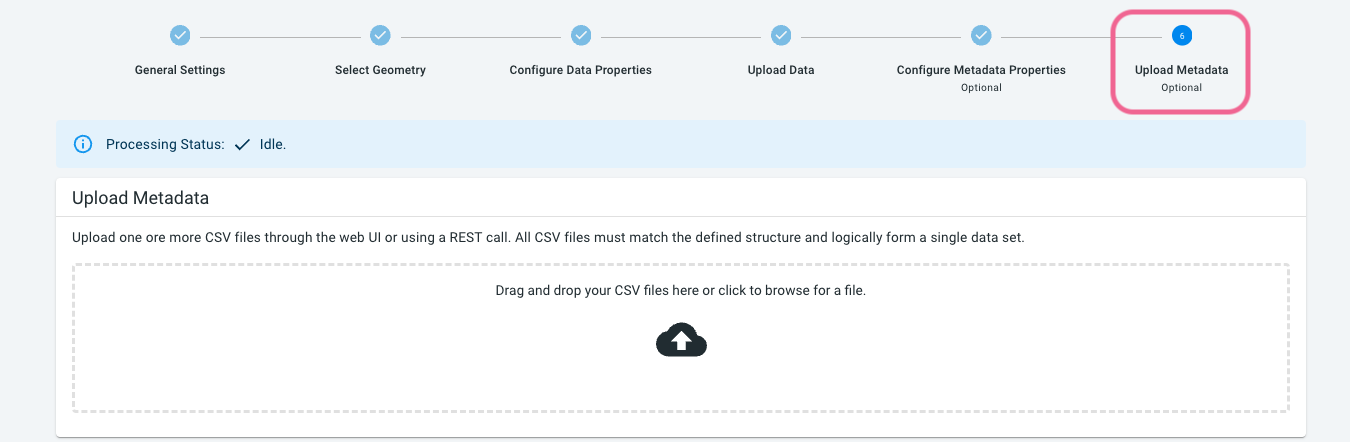
Figure 18. Drag’n’drop upload in step 6 of the data creation wizard of the trips .csv.gz files.
Now wait until all files are uploaded and processed. If all goes well, you should see a Processing Status Processing done with a summary on the number of files and number of records processed.
|
Each data set has a limit on number of records
Your account has a limit on the number of records in a single data set. This limit can range from 100 million to over a billion of records. This limit is determined by your license. If you upload more records than the limit, the last records will not be processed and a warning message will appear. Get in touch if you hit the limit and need to increase it. |
In the next part of the tutorial, you will learn how to get started using the created INRIX trip paths data set.
Next part
Go to the next part: Getting started using INRIX trips data
Got feedback? Additional questions? Just want to have a friendly chat?
Get in touch!