
Got feedback? Additional questions? Just want to have a friendly chat?
Get in touch!
Available parts
- Goal
- Step 0: Obtain data
- Step 1: Create data set
- Step 2: Define data structure
- Step 3: Configure processing settings (current)
- Step 4: Upload the csv files
- Step 5: Use your data set
- Further reading
Step 3: Define the processing settings
The next step after configuring the properties of your data is to configure the processing settings.
Click on the Configure processing settings button in the top navigation bar
Figure 1. The Configure processing settings button in the top navigation bar.
|
Processing settings can be adjusted afterwards
You can always adjust the processing settings, even when you have already uploaded data or data has already been processed. However, if data was already processed, it will have to be reprocessed which, depending on the size of the data, can take some time. |
Step 3.1: Configure the spatio-temporal resolution
For this data set, the default values are a good choice so nothing has to be changed here.

Figure 2. The default settings for the spatio-temporal resolution are fine for this data set.
Information about the spatial resolution
When working with big data sets, it is important to be able to see overviews and understand the distribution and identify so-called hotspots in your data. For this, the area is divided into a grid of cells and statistics are computed and visualized for these cells (e.g., number of vessels passing through the cell). Each cell has a size of spatial resolution by spatial resolution.
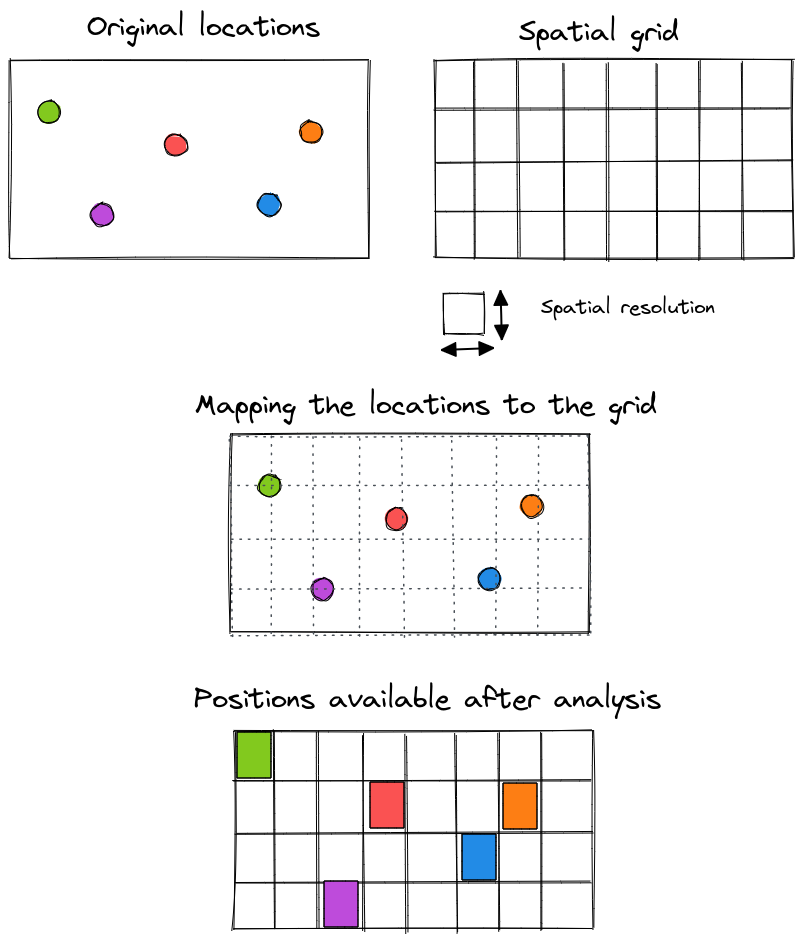
Figure 3. Illustration of how the spatial resolution affects the location available during analysis.
A good choice of the spatial resolution depends on:
-
The accuracy you need (or allow) during analysis.
-
The accuracy of the recorded positions in your
.csvfiles.
For example:
-
Outdoor GPS data typically comes with an accuracy between 1 and 100 meters.
-
Indoor Bluetooth location data is more accurate, typically in the 0.5 to 10 meter range.
For this AIS dataset, you can go with the default value of 25 meters. You can however, lower the spatial resolution to for example 1 (meter) to allow very fine-grained analysis up to the individual vessel level.
Information about the temporal resolution
The temporal resolution determines how many times an asset (e.g., a vessel) is counted in the same spatial cell.
For example, if the AIS data contains 2 recordings for the same vessel that:
-
Place the vessel in the same spatial cell,
-
and the time difference between those 2 recordings is smaller than the temporal resolution,
then, the second recording will be excluded from counting.
When that second recorded location would fall into a different spatial cell, it will always be included, independent of the time difference between the two recordings,
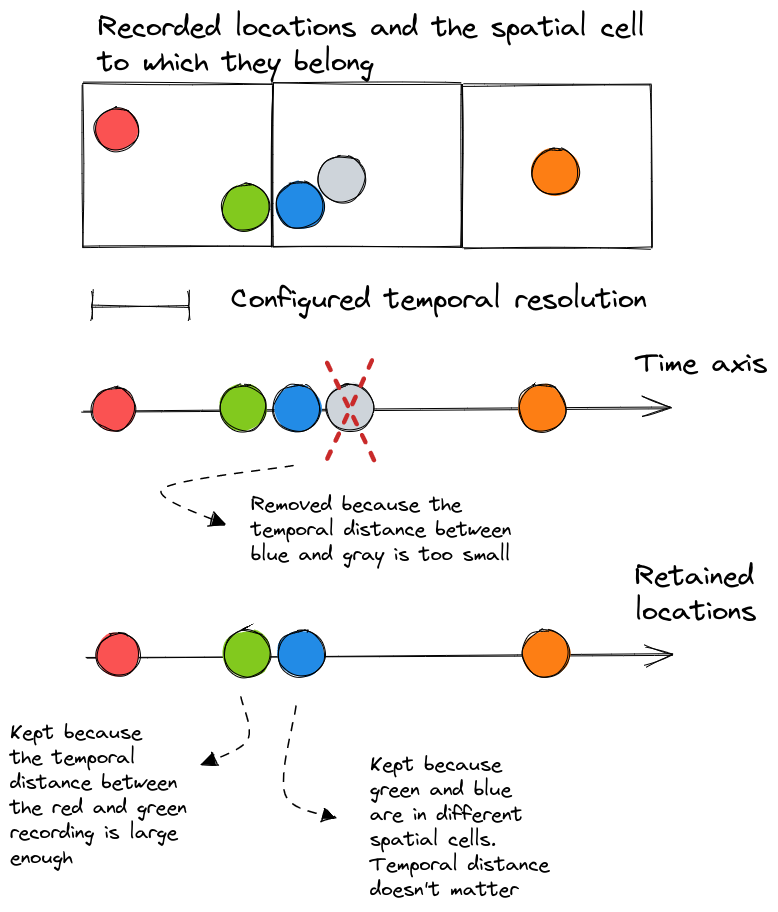
Figure 4. Illustration of how the temporal resolution affects which recordings are considered during analysis.
Also here a good choice is to use temporal resolution corresponding to the temporal sampling period in the data.
Step 3.2: Configure additional data representations
You can request the processing engine for two additional data representations which become available when doing visual analysis.
-
Trajectory data representation: connects for each asset subsequent points and allows to visualize those assets using line and icon drawings.
-
Realtime data representation: shows the latest reported location of each asset using icons.
You can enable both data representations. For the trajectories data representation, it is best to increase the distance and duration thresholds, as some AIS records of the same vessel are far apart. The thresholds are used to determine when to not connect subsequent records.
In the screenshot below, a distance threshold of 1000km is used as well as a time threshold of 24h.
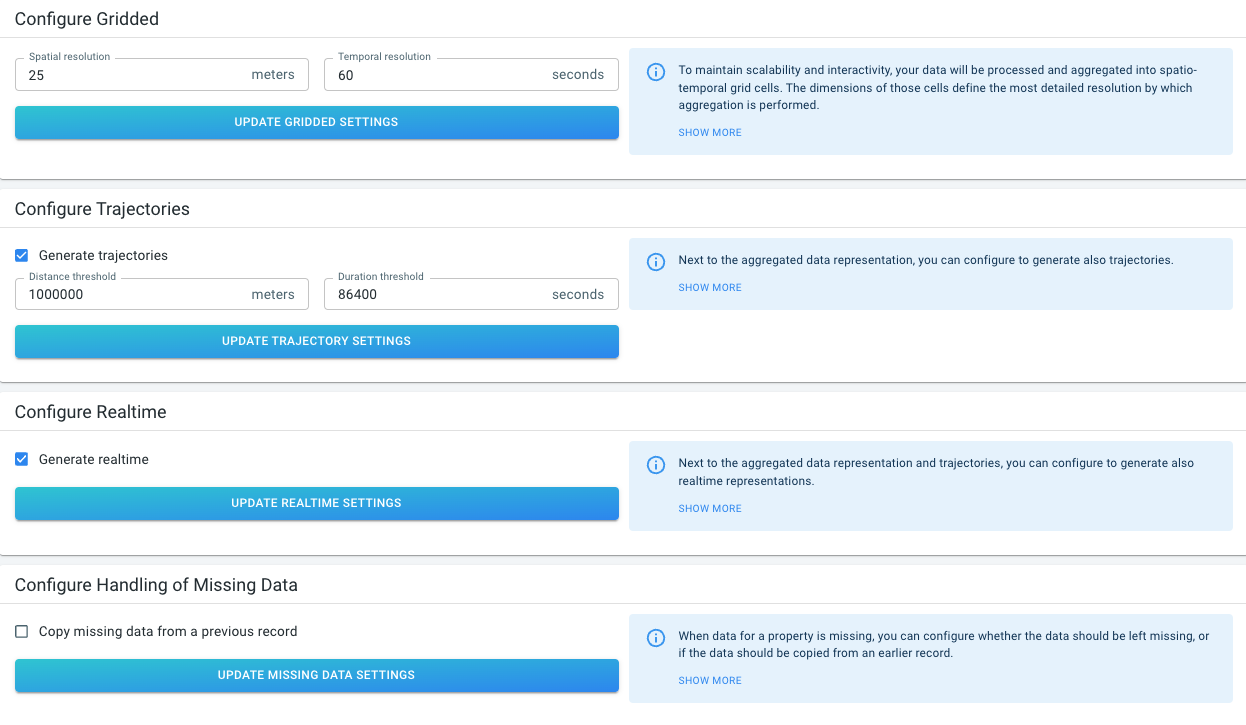
More information on these representations is available in this article.
Step 3.3: Configure how missing data is handled
Some datasets contain records where one or more values are missing.
The platform has two strategies to deal with those missing values:
-
Leave the value missing: the record will be processed with the missing value (except when the missing value is a required property like for example the timestamp). This is the default behavior.
-
Copy the missing value from a previous record: the platform will try to find an earlier record with the same id where that value is available, and copy that value.
|
Copying missing values from a previous record
When enabling the copying from a previous record, you need to provide the data sorted in time. |
For this tutorial, you can stick to the default behavior.
Next part
Go to the next part: Step 4: Upload the csv files
Got feedback? Additional questions? Just want to have a friendly chat?
Get in touch!